Showing posts with label DPP 1812 Waistcoat. Show all posts

Thursday, October 13, 2011

Double Period Project 1812 / 1912

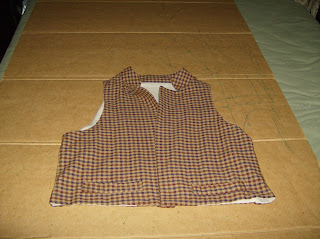
Ta Da, the finished waistcoat.  I think that it came out pretty well and and I quite pleased with it.  I like the larger standup collar.  Currently, I have pins holding it together.  Buttons will come later, the bulk of this task is done.  Well almost, all of the edges must be pick stitched to stop the lining from rolling to the outside.
But, I really don't mind doing that, it really makes a difference.


The finished waistcoat.  I should have placed the shirt inside before I took this picture, but I didn't think of it.

The lining with the fabric as facing.  The pockets are just flaps to mimick pockets, there really wasn't enough space left to make actual pockets.  I don't know if you can see, but I started the pick stitching, all of the edges will be pick stitched.


Double Period Project 1812 / 1912

The first thing that I wanted to do was to make a mockup of the pattern. It had been sometime since I had actually made this particular waistcoat.  Plus, I needed to change the collar. 

The picture above is the mockup with the completed shirt.  I actually like the material, the print is way to big for this regency waistcoat.  I think that I had just barely enough to make it.


This left over fabric was just enough and it was extremely light weight. The pattern pieces are layed out on the material.  I don't have an actual sewing room, I use the guest bedroom, so I can close the door when it get really messy with sewing projects.

All of the pattern pieces have been cut out.

That's Max taking a nap on the cardboard grid.  I added fabric facing to the lining.

The new collar.

I had to show you a picture of this.  To get to this point and turn the waist coat right side out took me forever. I initially, thought that I would save some sewing time by sewing up the sides prior to turning.
It just would not turn properly.  I tried and tried.  Finally, I looked back at the instructions which I had read and reread many times.  I finally noticed the illustration and it was just as you see it above.  You can not sew up the sides first.  So, a picture is worth a thousand words as they say.  I picked out the stitches in the previously sewed up sides and Voila!  The waistcoat turned to the right correctly.

Wednesday, October 5, 2011

Double Period Project 1812 / 1912

Below are a couple of pictures of the waistcoat that I previously made with this same pattern.  The pattern instructions were pretty straight forward.


In the picture below, you have a better image of the waistcoat collar, which for the DPP will need to be altered. 


While studying the potraits of men from this period, I noticed something.  The fabric which the waistcoat was made,  appeared to be extremely thin, perhaps silk, satin or some other fine light weight fabric. The fabric that I had initially selected to make the waistcoat was now to heavy. It was similar to the fabric used above.

Look at the man's collar above, it is very fine light weight fabric, perhaps silk. From the picture, it does appear to be lined as well. Notice the fine stitches joining the lining and the outer fabric. There is barely any width between the two joined fabrics.

The above waistcoat also shows how fine the waistcoat fabric is. Again, perhaps, silk.

After checking my stash of fabric, I came across this fabric which was a remant from a previous project. It was light enough, a cotton linen blend with a light plaid pattern.  This would do nicely.  Just needed to find some equally suitable lining fabric to compliment the outer fabric.

Tuesday, October 4, 2011

Double Period Project 1812/ 1912

The next item of the 1812 Man's Promenade or Walking suit will be the waistcoat.  There are many patterns for this style of  a regency waistcoat.  However, after reading several comments on the regency costuming board.  I started to look at the available patterns with a more discerning eye.  Some of the elements mentioned that should be present when attempting to recreate this particular regency style include: square or straight bottom front of the waistcoat.  The waistcoat has a very pronounced collar, it should be a standup collar.  It is difficult to tell from the paintings from this time whether or not the waistcoat had tie backs.  Most of the patterns do not place ties at the back of the waistcoat.  The waistcoat could just drop below the cutaway bottom of the frock coat or it maynot. The available paintings seem to indicate the drop is no more than an inch or two. Of course there are always variations on the theme.  Again, I think that a man's personal preference came into play here a bit.


One of the original inspirational pictures for the 1812 outfit. Notice the squareness of the waistcoat bottom.

This is a painting of a prosperous Baltimore merchant from 1812, by Peale.  Again notice the square bottom and the standup collar.

This picture is from the victoriana website, the square bottom of the waistcoat and the standup collar.

Another great painting from this period.  You can definitely see the standup collar quite nicely in this painting.